High School Lesson Plan
Note: This is a lesson from a unit that I taught. The teacher example I created for this lesson is at the bottom of the page.
Lesson Title: Designing Identification Badges
Length of Class: 1-2 Days
Length of Lesson: 2 hours
Grade: 9th-12th grade
Enduring Understanding: Artists and designers experiment with concepts and art-making approaches.
Essential Questions: How do artists and designers determine goals for designing or redesigning objects?
Learning Objectives:
Standards:
VA: Cr2.1.HSI Engage in making a work of art or design without having a preconceived plan.
VA: Cn10.1.HSI Document the process of developing ideas from early stages to fully elaborated ideas.
Vocabulary Terms:
Tools and Associated Hot Keys:
Materials:
Resources:
Motivation: The students will watch a demonstration using LanOver showing the basics on how to do the project by the teacher.
Engagement:
ARTMAKING DAY
Closure: Students will share with the class any problems they had or any successes they had. Students will help each other troubleshoot for the next project.
Modifications:
Assessments:
Lesson Title: Designing Identification Badges
Length of Class: 1-2 Days
Length of Lesson: 2 hours
Grade: 9th-12th grade
Enduring Understanding: Artists and designers experiment with concepts and art-making approaches.
Essential Questions: How do artists and designers determine goals for designing or redesigning objects?
Learning Objectives:
- Students will design at least two different badges using Photoshop.
- Students will select one badge as a final artwork to hand in.
- Students will describe the artmaking process for the final artwork in a written self-assessment.
Standards:
VA: Cr2.1.HSI Engage in making a work of art or design without having a preconceived plan.
VA: Cn10.1.HSI Document the process of developing ideas from early stages to fully elaborated ideas.
Vocabulary Terms:
- Lines: Different tools make different lines
- Shape: Shapes come in many types and sizes
- Color: Every color can be bright, dull, dark, or light.
- Value: Value refers to dark and light in painting or drawing.
- Form: Form is three-dimensional and takes up space.
- Texture: Texture is how the surface of something feels or looks.
- Space: We use illusions to make space in art.
Tools and Associated Hot Keys:
- Marquee: M
- Move: V
- Layers: F7 to show
- Erase E; E and [ to make bigger, E and ] to make smaller.
- Zoom: cntrl and + to zoom in, cntrl and – to zoom out
- Brush: B; B and [ to make the brush bigger, B and ] to make smaller.
- Ink dropper: I
- Text: T
Materials:
- Photoshop
- Microsoft 365
Resources:
- Desktop Computers
- Microsoft Teams
- Projector
- Whiteboard
- Objectives Display
- LanOver
Motivation: The students will watch a demonstration using LanOver showing the basics on how to do the project by the teacher.
Engagement:
ARTMAKING DAY
- Students look up one portrait to use for their badge. They should use image filters on their search, looking for large images.
- On Google, this is:
- Tools
- Image Size: Large
- The students will save the image from the web and open it in Photoshop.
- Resize the image, so it is in portrait mode.
- Height: 11
- Width: 8.5
- Resolution: 150
- Make a new file. They should Marquee their image file and Move their image to the new blank file. There should be 2 layers when completed.
- Height: 11
- Width: 8.5
- Resolution: 150
- If students want to use a second image as a background, they may do so. They need to resize it in Photoshop the same size. Then,
- Make a new file
- Height: 11
- Width: 8.5
- Resolution: 150
- Use the Marque tool to select one of the images in its edited size. (“M”)
- Use the Move tool to drag the selection to the new file and add a new layer (“V”).
- Repeat the process for the 2nd image. Drag the background image as 2nd layer so the portrait is on top. If students are using an image as a background, it should stay within the theme of the badge. For example, Gilligan of Gilligan's Island
- Drag the pictures to where they belong in the badge. Erase the portions of the portrait as needed – students should keep their faces visible and intact.
- Create a background if not using the 2nd image as a layer. Students may use the Brush and the ink dropper tools instead. Instead of a different image, students should use the blank layer that was created when they moved their image. To create different backgrounds on the same layer, students may use the Marquee tool, select, then use the Brush to color in that section. Students may use different Brush types and use the Ink Dropper tool to find the colors to use.
- Add text information.
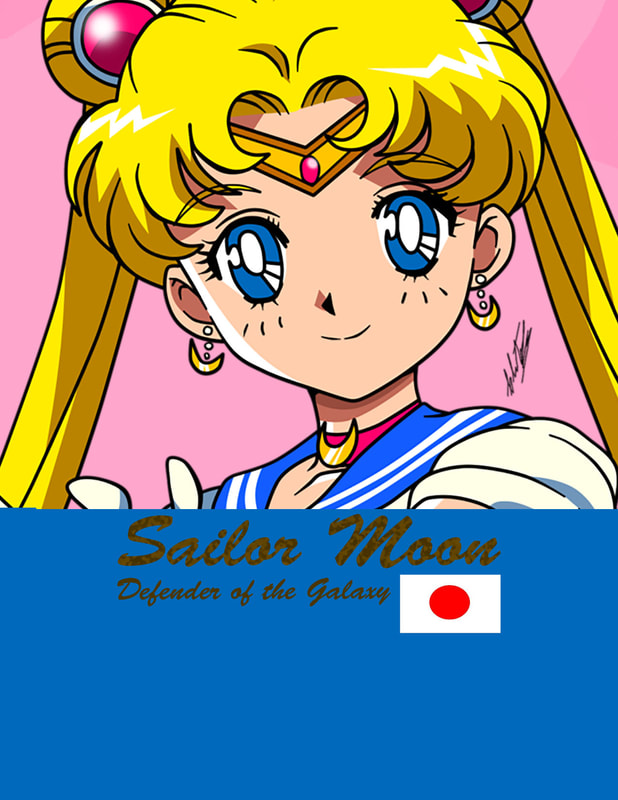
- Name of work, school, or country (for example, Sailor Moon is a Japanese anime)
- Name of the person in the portrait
- Position of the person (can be anything ranging from “vampire” for Dracula to “student” for themselves.)
- Right-click on the text layer. Click rasterize type. Text is now stable and cannot be changed.
- Review. Save as JPEG. Name as “(your name) ID# (Practice or Final)”
- When finished with both practice and final, they will complete a written self-assessment.
Closure: Students will share with the class any problems they had or any successes they had. Students will help each other troubleshoot for the next project.
Modifications:
- Student Education: If Special Education students are present, modifications will be made according to their IEPs.
- Gifted Students: If students finish early and hand in their project, they will design a business card for themselves.
Assessments:
- Formal assessments: Final artwork, Self-assessment
- Informal assessment: Practice artwork
